WilsonFlow Timeframe Matrix
Column agreement first. Gauges second. A cell is not a trade.
Screenshot / cover
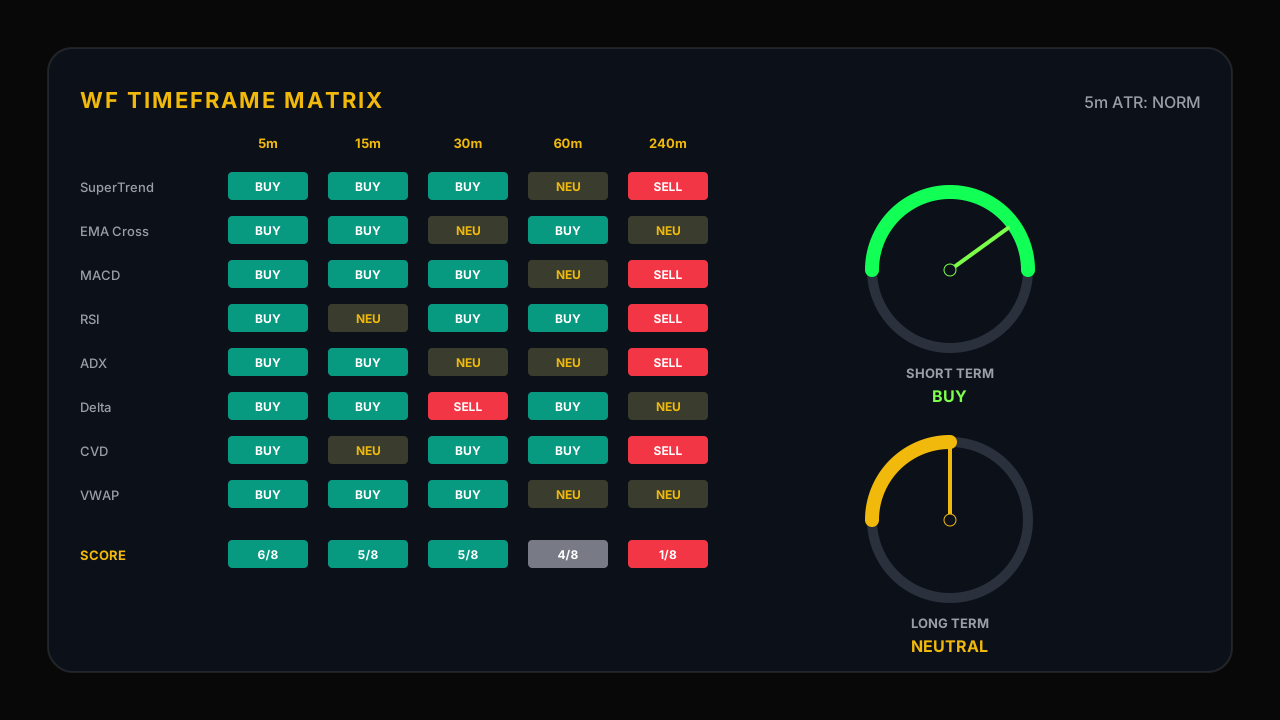
Schematic layout — not a live chart.
What it is
WilsonFlow Timeframe Matrix is an ATAS overlay cockpit: an 11-row × 5-column BUY/SELL/NEU grid plus two spectrum gauges. Column 1 is the host chart. Columns 2–5 are higher timeframes aggregated from those same bars (defaults 15 / 30 / 60 / 240 minutes) — not a separate HTF feed. A column is only live if the chart is strictly faster than that column; otherwise it paints NEU. Each row is one technical vote on that timeframe: SuperTrend (price vs ATR trail), EMA Cross (8 vs 21), MACD (12/26/9 histogram side), RSI 14 vs 55/45, Stochastic (%K vs %D, with 80/20 as NEU), ADX 14 (NEU if ADX is below the threshold, else +DI vs −DI), bar Delta (real Ask−Bid when the feed has it), CVD (rising or falling cumulative delta), VWAP (close vs session typical VWAP), Delta/Vol (delta÷volume vs 0.10), and Vol Bias (volume above its SMA and close in the upper/lower third of the bar). The SCORE row is BUY-count / rows, not a signal. SHORT TERM averages bull% of the first three columns; LONG TERM averages the last two. Gauge labels: Strong BUY ≥80%, BUY ≥60%, NEUTRAL mid, SELL ≤40%, Strong SELL ≤20%. When both gauges sit on the same side, Highlight Gauge Agree can box them. Compact Mode hides Stoch, Delta/Vol, and Vol Bias. CVD and VWAP reset on a calendar-day change when Session Reset CVD is on. This is a confluence map of states — not Predicta, not an entry, not financial advice.
What to look for
- SCORE that is clearly majority BUY or SELL on several columns, not 4/8 vs 5/8 noise
- Chart + 15m + 30m (short stack) the same color before you care about the short gauge
- 60m + 240m (long stack) agreeing with the short stack — that is the slower boss
- SHORT TERM and LONG TERM gauges both BUY or both SELL (Agree box) vs one stretched and one NEUTRAL/opposite
- Header ATR: HIGH vs LOW vs NORM on the chart TF — expansion vs dead tape
- ADX row NEU: the timeframe is not trending by the ADX threshold; do not overweight that column
- Stoch NEU at the 80/20 extremes — the code will not vote BUY just because %K is high
- Delta, CVD, and VWAP on the same side as SuperTrend/EMA as flow confirmation — or fighting them as a caution
- Unusable HTF columns all NEU: chart TF is too slow for that column (e.g. 15m chart cannot fill a 15m column)
- Cells flipping every bar, SCORE oscillating through 50%, gauges twitching — chop; skip the read
Settings that matter
- Chart timeframe: use 5m (or faster) so 15/30/60/240 columns can all fill. A 15m chart blanks the 15m column.
- TF2–TF5 Minutes (defaults 15 / 30 / 60 / 240) — keep a real step-up; do not stack four copies of the chart TF
- Compact Mode — on hides Stoch, Delta/Vol, Vol Bias and changes SCORE out of 8 instead of 11
- RSI Buy/Sell (55 / 45) and ADX Threshold (25) — the NEU band; tightening them forces more cells to pick a side
- SuperTrend Factor 3 / ATR 10 and EMA Fast/Slow 8 / 21 — structure rows; do not retune every session
- Delta/Vol Threshold (0.10) — below this, Delta/Vol stays NEU even if delta is not zero
- Session Reset CVD (default on) — CVD and VWAP restart on calendar date change; know that overnight vs RTH is not a 18:00 ET futures day
- Dashboard Position / Size — Top Right and Normal by default; keep the grid readable without covering price
- Animate Gauges + Gauge Ease K (0.25) — visual lag only; the underlying % is the lean. Rim thickness/radius are cosmetics
- Highlight Gauge Agree — yellow box when short and long gauges share a side; it is a reminder, not a trigger
Common mistake
Taking one green BUY on the chart column as confluence. SCORE counts BUY cells only; a 5/11 with mixed 60m/240m is not agreement. The second mistake is hanging the matrix on a chart slower than TF2 (15m default): those HTF columns stay NEU because they are aggregated from the host chart, not a separate feed. Put it on 5m or faster. Do not treat a gauge needle as an entry, and do not fade a Strong BUY short gauge while the long gauge is still BUY.
Pairs well with
- Liquidity Pro Map
- Footprint Confluencer
- Wilson Adaptive SuperTrend
- Predicta Futures Next Candle V4